Madison Railroad
"High Rise Buildings"
During the construction of the layout, High Rise Building kits that were 5 or more stories high were not available, which caused me to kitbash several buildings into the desired height needed at that time. I employed DPM kits to achieve what I wanted.
To begin, I'd like to take you through a step by step method that I used to obtain the required High Rise Buildings.
Tools: The basic tools that I used were:
1- A combination Square.
2- A medium tooth model razor saw.
3- An ordinary lead pencil.
4- A sheet of Medium grit sandpaper.
To manufacture a High Rise Building I used the above tools along with several DPM kits of the same style and the desire to complete a building.
Construction:
Let's get started constructing a styrene 5 story high rise building. More stories can be added if you like. However, you will need additional kits to obtain the additional stories desired.
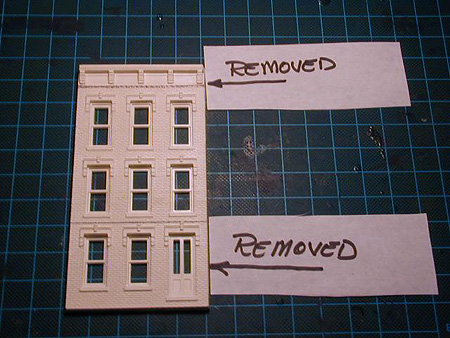
1- Open the first package and remove the front wall casting. Using the combination square and pencil, draw a line just below the top roof coping, as shown in photo 1 below. The roof coping must be removed to allow for the fourth and fifth stories to be added to the building.
Photo 1
Remove "only" the roof coping as shown in the above picture. Do not remove the lower portion of the front casting at this time.
2- Set the front aside and take the sidewalls and rear wall from the kit package. Mark and remove the side and rear wall roof coping "only" as shown below in photo 2. Once again, do not remove the lower portion of the castings. We want to maintain uniformity of this lower portion of the High Rise Building.
Photo 2
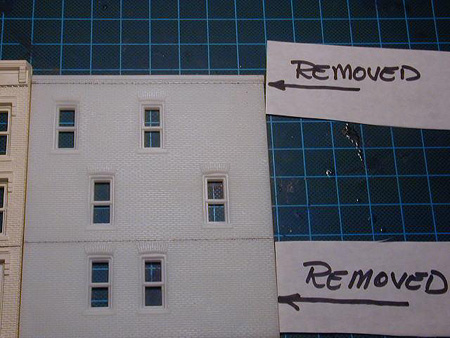
When finished cutting the coping from the roof line of the castings, you will have 3 stories of the building remaining.
It's suggested that you number the back side of these castings in pencil as being 1A,1B, 1C and 1D. Place all the castings aside at this time to be identified and used later.
3- Now remove the front wall casting from the second kit and remove the first story "only" as shown in photo 1 above. This will leave you with a casting that has two stories along with the top roof coping.
4- Remove the remaining side and back walls from the kit package and cut as shown in photo 2 above. This will leave you with castings that "only" have two stories along with the top roof coping. Mark these castings in pencil on the back side as being 1B, 2B, 3B, and 4B and place these aside.
If you desire to have additional stories you will need a third or fourth kit. Remove the first story and the top roof coping as marked in photos 1 and 2 above from all four walls. Mark the back side of these castings as being C's and D's accordingly.
5- Place each cut edge of the castings labeled 1A, 2A, 3A and 4A against a sheet of medium grit sandpaper that is placed on a hard flat surface one at a time to remove any burrs or deformities from the castings when the coping and lower portions were removed. Drag or push each casting edge against the sandpaper keeping it as level as possible. Otherwise if you move the casting back and forth quickly you may cause the edges to roll which will prevent a squared edge.
Note: Depending on the kit used, read the kit manufacturers instructions before proceeding. Some kit manufacturers require beveled edges to remove the castings from the mold at the time of manufacture. Square these edges at this time as instructed by the kit manufacturer on all kit castings after you cut the various sections as instructed above.
6- Do likewise with the castings labeled 1B, 2B, 3B and 4B. Check to see how the front casting 1B fits against casting 1A and adjust to fit tightly without any spaces. Spaces will adversely affect the appearance of the finished building.
7- With all the castings fitted as required, apply a thin coat of liquid plastic cement or plastic cement of your choice to the top of casting labeled 1A and press casting number 1B against it. Allow the cement to set completely on a flat surface. If needed, use masking tape to hold the castings in place while the cement is setting.
8- Do likewise with all the remaining castings. Allow all of the castings to completely set before moving them.
9- When set, reinforce the cut seams on the backside of all the castings with styrene strips cut to a size large enough to provide reinforcement.
10- Glue all of the sides together with plastic cement. Use rubber bands to hold the walls together while the glue dries.
The finished 5 story building can be seen below.
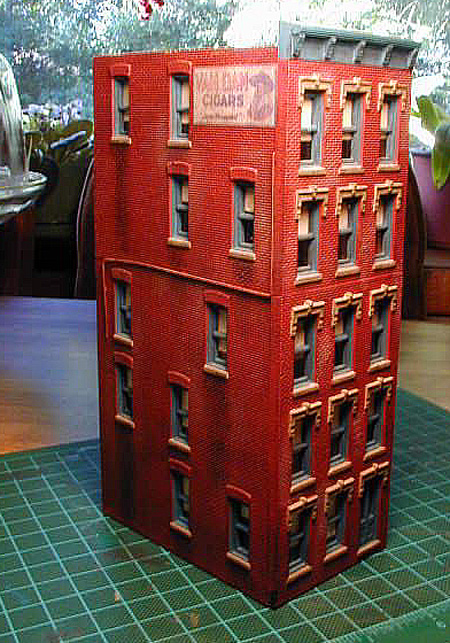
An electrical conduit was added to the side wall to help hide the seam that existed after construction.
11- Paint and weather the building as desired and later spray the entire building with "Dull Cote" to fix the paint and weathered surfaces. Add the window glass and what details you desire as window dressing. The roof is added last and detailed as desired.
Have fun, don't make a job of it. I built two cities using the above techniques.
[Home] [About Me] [History] [Photo Gallery] [Links] [High Rise Buildings]
[Photography] [Prototype Pictures] [Interchange Cars] [Exchange Cars]